
BOOKMARK THIS PAGE Click on photos below for enlargements.
Click on photos above for enlargements.
|  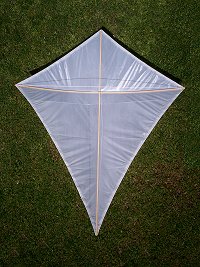 Garbage Bag Kite
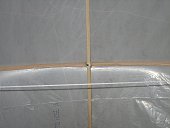
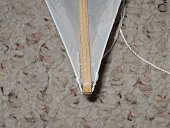
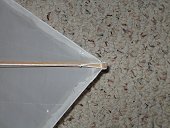
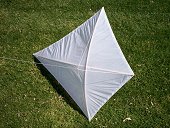
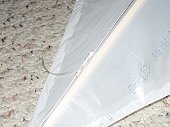
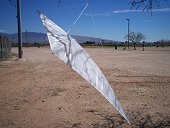
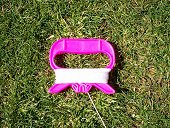
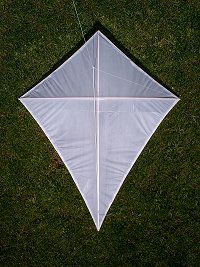
Last Updated March 6, 2007. Click on the upper right photos for enlargements. Front Page Patrick's Kite Page Hal's Kite Page Introduction After seeing my stunt kites, my youngest granddaughter asked me to make her a kite. "Of course, Sweetheart" was my reply. I had eleven days to make a kite before her next visit but, after purchasing the necessary parts, it only took me about 4 hours the next day. The result was a kite that flies well in the slightest breeze, as well as in moderately strong winds, with no tail required. Materials Required The items I used to build my granddaughter's kite are as follows: 2 - spruce sticks, 3/16" square by 36" long (Ace Hardware near 22nd St. & Kolb, in the hobby store) 1 - kitchen garbage bag 1 - roll of kite string on a pink winder (Ace Hardware near 22nd St. & Kolb) See photo. 1 - roll of Scotch tape 1 - small container of Super Glue (also known as Cyanoacrylate) Tools Needed Scissors, a razor blade knife, a tape measure, a magic marker, and a yard stick or a straight edge at least three feet in length Construction Details Before beginning, familiarize yourself with all of the photos on this page." Click on each thumbnail photo to see an enlargement. Left click on the enlarged photo to return to this page. The first step is to make the stick frame. The vertical stick remains 36" in length but cut the horizontal stick to 30" in length. Use a length of kite string to connect the two sticks together, 11" from the top of the vertical stick. Be sure that the sticks are perpendicular to each other. To secure the connection between the two sticks, drip several drops of Super Glue on the string and knot. Be sure that the glue saturates all of the string. Allow the Super Glue to completely dry. Use Super Glue only in a well ventilated area. Do not inhale the fumes! Inhaling the fumes may cause serious respiratory complications or death! Click here to see a close up photo of the sticks tied together. At the tip of each stick, use a razor blade knife to cut a small groove. The grooves must be parallel to the plane of the kite, so they will accommodate the sting that will be wrapped around the outer edge of the kite. Drip one drop of Super Glue into all four grooves and allow the Super Glue to dry. This will bond the wood and keep the string from splitting the wood. Click here to view a close up view of the bottom groove of the vertical stick. The bow string is made and installed next. Tie a small loop in one end of a length of string. With a little experimentation, discern how long the string needs to be to make a 4" tall bow in the horizontal stick. Tie a loop in the other end of the string and hook the loops in the grooves at both ends of the horizontal stick, as shown here and here. Wrap another length of string around the circumference of the kite, through all four grooves. Pull the string tight enough that it bows the vertical stick about 2" in the same direction as the horizontal bow. Lay a yard stick on the vertical stick to determine the bow. Tie the ends of the string together with a knot that will not pull out. Adjust the position of both sticks so that they are straight and also perpendicular to each other. Drip a SINGLE DROP of Super Glue on each of the four grooves and let dry. This will keep the strings from coming off or shifting. Next, the sail of the kite will be made from the kitchen garbage bag. Cut open your bag so that it will cover the entire area of the kite. Place the bag on the opposite side of the kite from the bow string and temporarily tape it to the sticks to hold it in position. Lap the outer portions of the bag over the string that runs around the perimeter of the kite and pull it tight enough to bow the string in just slightly on all four sides. Temporarily tape the bag in place and use a magic marker to mark a 1/4" overlap all the way around the perimeter of the kite sail, where the bag overlaps the string. With scissors, cut along the line and remove the excess bag. Next, the sail will be permanently attached to the kite. Start by cutting lengths of Scotch tape about 2" long. Split the lengths of Scotch tape with scissors or a razor blade knife, so that the lengths of tape are half as wide as they were originally. Along one edge of the kite, wrap the sail over the perimeter string so that you once again have an overlap of 1/4" and use the narrow lengths of tape to attach the 1/4" overlap to the back side of the sail. Repeat this process on the remaining three sides of the kite. To see a photo of the taped overlap, click here. Take your time and the sail will come out fine. If something goes wrong with your sail, carefully take it off, making sure not to damage the strings or sticks, and start again with another garbage bag. Next, the kite's 4 point harness will be attached to the kite. The four point harness is made of several lengths of kite string. The harness has three functions. The first is to attach the kite to the kite string. The second is to help stabilize the kite in flight. The third function is to adjust the kite's flight characteristics. Start by cutting a length of kite string that is approximately two feet longer than the width of the kite. Securely attach one end of the string to one end of the horizontal stick. Drape the string over the front of the kite and toward the other end of the horizontal stick, leaving enough slack so that at the center of the kite you can hold the string away from the kite at a height of 8". Then, securely tie the string to the other end of the horizontal stick, as shown here and here. Next, cut a length of kite string that is approximately one foot longer than the length of the vertical stick. Securely tie one end to the top end of the vertical stick. Next, cut another length of kite string about 6" long. Tie a small loop in one end of the 6" string and securely tie the other end to the bottom of the vertical stick. As shown here, connect the longer top string to the shorter bottom string by threading the top string through the small loop in the bottom string and tying a bow or a knot that can easily be untied. Leave enough slack so that the vertical string can be held 8" above the center of the kite, where it will intersect with the string that is connected to both ends of the horizontal stick. With a magic marker, make a mark on the vertical harness string 12" from the top of the kite. This is the point where the vertical and horizontal harness strings SHOULD intersect. This is also the point where your kite string, coming from the winder, will connect to the harness. Adjusting the 4 Point Harness Temporarily tie the end of the kite string (that is connected to the winder) to the harness, by wrapping it several times around both harness strings and tying it in a bow or a knot that can easily be untied. Pick up the kite by its kite string and adjust the vertical harness string, at the loop and at the magic marker mark, so that the kite hangs with its tail down at a 45 degree angle, as shown here. Then, secure the vertical harness string by tying a knot at the loop, as shown here. Finally, tie a more secure knot at the point where the kite string and the harness connect. At this point, your kite is complete! WARNING For your safety and the safety of your children, do not fly kites near electrical power lines. You do not have to touch a power line with your kite, or with its string, to be electrocuted. The high voltage of a power line can easily arc to your kite. This type of electrocution may cause serious injury or death. If you have questions about building this kite, please feel free to contact me. I will be happy to answer your questions. Cordially, Hal Krohn |
BOOKMARK THIS PAGE
Front Page Patrick's Kite Page Hal's Kite Page Contact Us
Copyright © Halice Internet Services. All Rights Reserved.
Front Page Patrick's Kite Page Hal's Kite Page Contact Us
Copyright © Halice Internet Services. All Rights Reserved.